
Amazing Pumpkin Patch Deviled Eggs for Fall

Oh, the crisp air, the vibrant colors, and all the wonderful smells of fall! It’s truly my favorite time of year, especially when it comes to gathering around the table with loved ones. If you’re like me, you’re always on the lookout for festive, fun, and delightfully easy recipes to share. That’s why I’m so excited to share my recipe for Pumpkin Patch Deviled Eggs with you today!
These aren’t just any deviled eggs; I’ve transformed a classic appetizer into an adorable, spooky, and utterly delicious treat perfect for fall gatherings, Halloween parties, or even a cozy autumn brunch. With their charming pumpkin design, they’re sure to bring smiles to everyone’s faces. The best part? You can have these adorable little pumpkins ready in about 30 minutes, not including the egg boiling time.
Table of Contents
Why You’ll Adore These Festive Pumpkin Patch Deviled Eggs
I truly believe these deviled eggs will become a staple in your fall entertaining repertoire. Here’s why I know you’ll love them:
- Festive Charm: My favorite part is how they instantly add a touch of autumn magic to your spread. The pumpkin design is simply adorable and so perfect for the season.
- Effortlessly Easy: Despite their impressive look, these deviled eggs are incredibly simple to make. I’ve broken down each step to ensure your success, even if you’re new to deviled egg making.
- Classic Comfort: Who doesn’t love a good deviled egg? I stick to a tried-and-true flavor profile that’s creamy, tangy, and always a crowd-pleaser.
- Customizable Fun: From the paprika dusting to the chive stems, I’ll show you how you can personalize these to make them uniquely yours. They are just so much fun to create!
Gather Your Ingredients for Pumpkin Patch Deviled Eggs
Before I start cooking, I always make sure I have all my ingredients ready. It just makes the whole process so much smoother and more enjoyable! Here’s what you’ll need for my recipe:
- 6 hard boiled eggs
- 1/4 cup mayonnaise
- 1 teaspoon dijon mustard (or yellow mustard)
- 1/8 teaspoon black pepper
- 1 teaspoon paprika (plus more for garnish)
- salt (to taste)
- chives (snipped, for the stems)
When I’m choosing eggs, I always look for ones that are a few days old; they tend to peel more easily than very fresh eggs. For the mayonnaise, I prefer a good quality full-fat mayo for the creamiest texture, but light mayonnaise works too if you prefer. Dijon mustard adds a lovely, sharp tang, but yellow mustard offers a more classic, mild flavor. Feel free to use whichever you have on hand or prefer. As for paprika, I use sweet paprika for its vibrant color, but smoked paprika can add a wonderful depth if you enjoy a smoky flavor. Hot paprika, of course, will give it a nice little kick!
Step-by-Step: Crafting Your Pumpkin Patch Deviled Eggs
Now, let’s get to the fun part: making these festive treats! I’ll guide you through each step, just like I would if we were cooking together in my kitchen.
- Carefully remove the shells from the boiled eggs. This is an important step because you don’t want any gouges or scrapes in the cooked white since it will be on display. Once they are peeled, rinse and pat dry with paper towels, then slice them in half lengthwise. I always try to make my cut as clean as possible right down the middle.
- Gently remove the yolks and place in a small bowl. Mash the yolks with a fork until there are no more large chunks. I really take my time here to get them as smooth as possible, which helps create a beautiful, creamy filling.
- To the yolk mixture, add mayonnaise, mustard, pepper and paprika and mix until nice and smooth. Add salt sparingly, stirring thoroughly after each addition, until you reach the desired flavor. I always taste a tiny bit of the mixture at this stage to adjust the seasoning; it’s important to get it just right!
- Pipe egg yolk mixture into egg white centers. I used a round tip, but you can just as easily spoon the mixture into the eggs as well. If I’m piping, I hold the bag upright and pipe a small mound, building it up into a dome shape. If I’m using a spoon, I gently scoop and shape the filling.
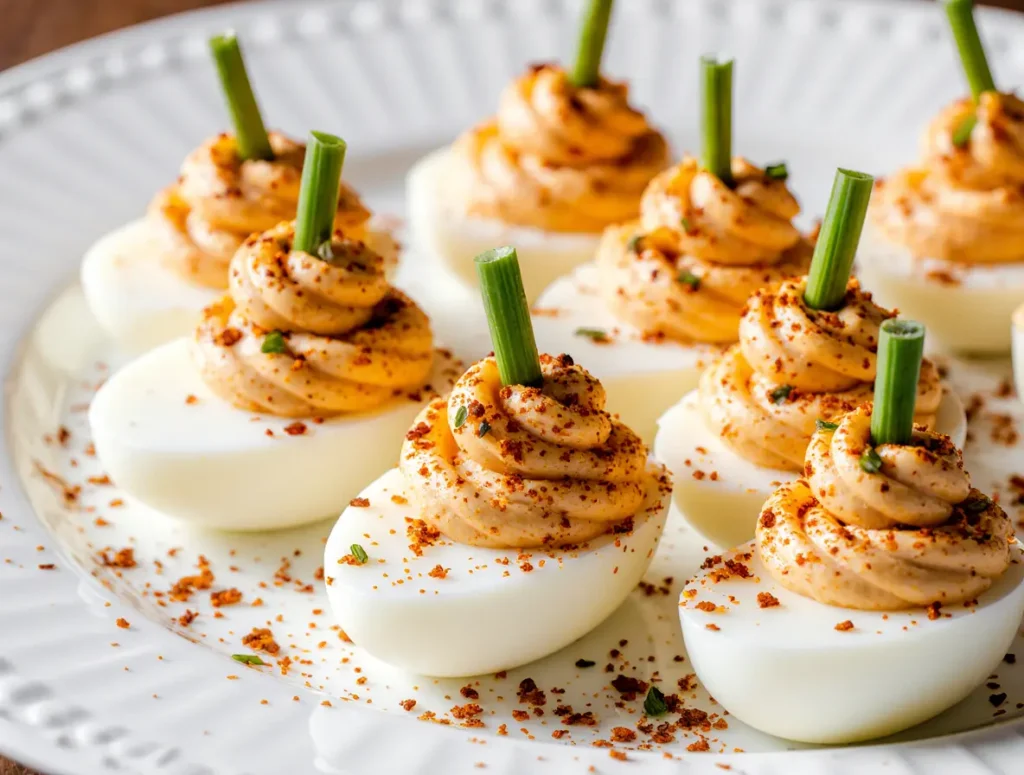
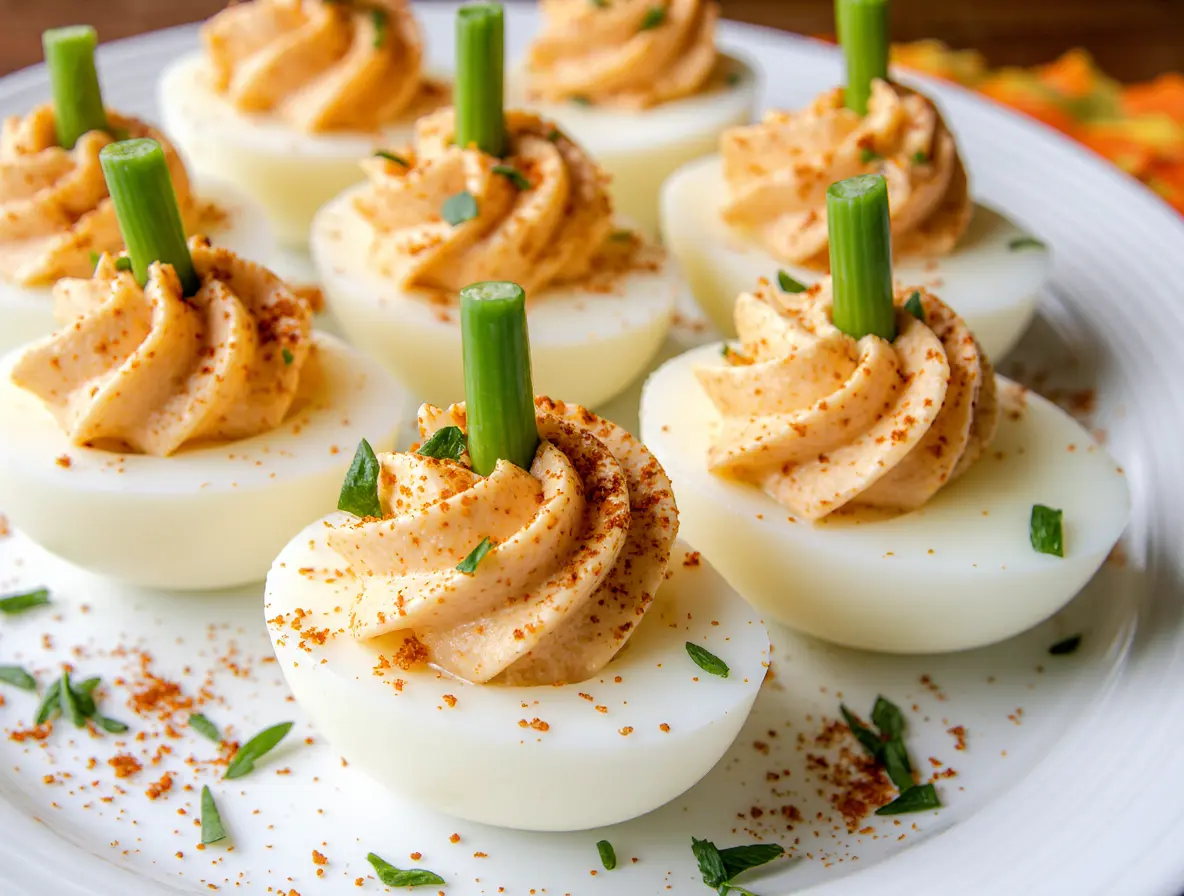
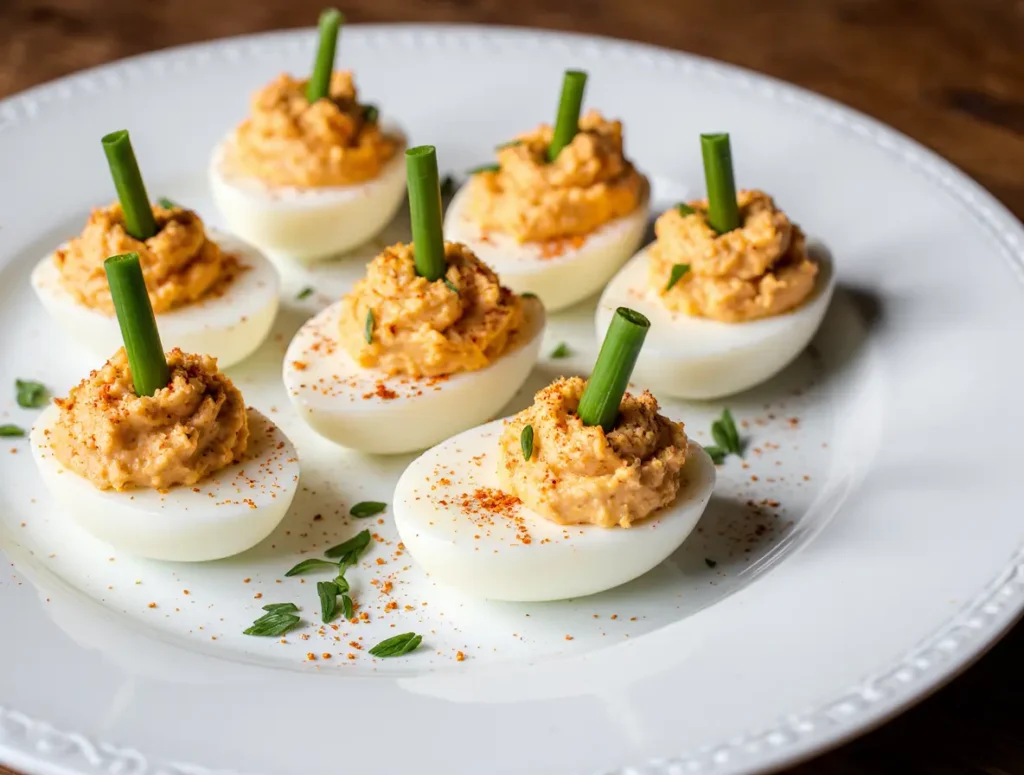
- Use a toothpick to gently create ridges on top of the piped egg yolk mixture to mimic the look of a pumpkin. Add snipped chives to the top of the deviled eggs to make a pumpkin stem. I make 4-5 gentle indentations from top to bottom around the mound to create that classic pumpkin texture.
- Lightly sprinkle the eggs with paprika. This final dusting really enhances the pumpkin color and adds a lovely touch.
- If you are taking your deviled eggs to a gathering, pop them into a deviled egg tray secured with a lid. This keeps them safe and sound during transport!
Amazing Pumpkin Patch Deviled Eggs for Fall
Ingredients
Equipment
Method
- Carefully remove the shells from the boiled eggs. This is an important step because you don’t want any gouges or scrapes in the cooked white since it will be on display. Once they are peeled, rinse and pat dry with paper towels, then slice them in half lengthwise. I always try to make my cut as clean as possible right down the middle.
- Gently remove the yolks and place in a small bowl. Mash the yolks with a fork until there are no more large chunks. I really take my time here to get them as smooth as possible, which helps create a beautiful, creamy filling.
- To the yolk mixture, add mayonnaise, mustard, pepper and paprika and mix until nice and smooth. Add salt sparingly, stirring thoroughly after each addition, until you reach the desired flavor. I always taste a tiny bit of the mixture at this stage to adjust the seasoning; it’s important to get it just right!
- Pipe egg yolk mixture into egg white centers. I used a round tip, but you can just as easily spoon the mixture into the eggs as well. If I’m piping, I hold the bag upright and pipe a small mound, building it up into a dome shape. If I’m using a spoon, I gently scoop and shape the filling.
- Use a toothpick to gently create ridges on top of the piped egg yolk mixture to mimic the look of a pumpkin. Add snipped chives to the top of the deviled eggs to make a pumpkin stem. I make 4-5 gentle indentations from top to bottom around the mound to create that classic pumpkin texture.
- Lightly sprinkle the eggs with paprika. This final dusting really enhances the pumpkin color and adds a lovely touch.
- If you are taking your deviled eggs to a gathering, pop them into a deviled egg tray secured with a lid. This keeps them safe and sound during transport!
Notes
Troubleshooting Common Deviled Egg Challenges
Even with the best intentions, I know things don’t always go perfectly in the kitchen. Don’t worry, I’ve got you covered with solutions for some common deviled egg hiccups!
If your piping looks uneven, or if you’re struggling to make those neat pumpkin mounds, don’t fret! I suggest going back to the spoon method. Sometimes it’s easier to control the shape with a spoon, especially if you’re new to piping. You can always use the back of the spoon to smooth and shape the filling once it’s in the egg white.
If your yolks aren’t smooth enough, even after mashing, I highly recommend that fine-mesh sieve trick I mentioned earlier. Just press the mashed mixture through it with the back of a spoon. It takes an extra minute but results in a wonderfully creamy, lump-free filling that’s much easier to pipe or spoon neatly.
For flavor imbalances, remember to taste as you go! If it’s too bland, I’ll add a bit more salt, a tiny squeeze of mustard, or a pinch more pepper. If it’s too tangy, a small bit more mayonnaise can help mellow it out. I always adjust seasonings in small increments until I reach that perfect balance.
Make-Ahead & Storage Solutions for Your Deviled Eggs
Deviled eggs are a fantastic make-ahead appetizer, which is something I truly appreciate when I’m planning for a party! I do have some specific ways I like to prepare and store them to keep them fresh and delicious.
To make them ahead, I recommend preparing the hard-boiled egg whites and the yolk mixture separately. Once peeled, I store the egg white halves gently arranged in an airtight container in the refrigerator. For the yolk mixture, I place it in an airtight container or a piping bag with the tip snipped off (and secured with a clip or knot) in the fridge. This way, the whites stay firm and the filling maintains its vibrant color and smooth texture.
I typically combine them no more than a day in advance of serving. Assembled deviled eggs should be stored in an airtight container, preferably in a deviled egg tray that keeps them from shifting, in the coldest part of your refrigerator. Always keep them chilled, especially since they contain mayonnaise, to prevent any food safety issues.
Properly stored in the refrigerator, assembled deviled eggs are best enjoyed within 2 days for optimal freshness and flavor. If you’ve stored the components separately, I find they can last up to 3 days.
Serving & Presentation Ideas for Your Pumpkin Patch Deviled Eggs
These Pumpkin Patch Deviled Eggs are so versatile, and I love finding new ways to present them to truly highlight their festive nature! They’re not just for Halloween, they’re perfect for any fall celebration.
For a classic “pumpkin patch” look, I arrange them artfully on a bed of fresh, washed kale or parsley on a large platter. The green mimics grass, making those orange pumpkins really pop! I might even add a few small, decorative gourds or mini pumpkins around the platter for extra charm.
If I’m going for a “haunted graveyard” theme for Halloween, I’ll arrange them on a dark platter and maybe sprinkle a little black sesame seed “dirt” around them, perhaps even adding some small plastic spiders for a fun, spooky touch. For a more sophisticated “harvest festival” table, I’ll place them alongside other autumnal appetizers like a seasonal cheese board, spiced nuts, and apple slices, perhaps with a rustic linen runner.
These deviled eggs pair wonderfully with a crisp hard cider, a glass of dry white wine, or even a sparkling apple cider for a non-alcoholic option. They are a delightful addition to any appetizer spread, serving as a flavorful and visually appealing counterpart to heartier fall dishes.
Frequently Asked Questions About Pumpkin Patch Deviled Eggs
I often get questions about making deviled eggs, especially when they have such a fun design. Here are some of the most common ones I hear:
How do you hard-boil eggs perfectly for deviled eggs?
I find the best method involves gentle cooking and an ice bath. I like to place my eggs in a pot, cover them with about an inch of cold water, bring it to a rolling boil, then turn off the heat, cover the pot, and let them sit for 10-12 minutes. Immediately transfer them to an ice bath for at least 5 minutes to stop the cooking and make them easier to peel. Older eggs also tend to peel more easily than very fresh ones.
Can I make these Pumpkin Patch Deviled Eggs in advance?
Absolutely! I recommend preparing the egg white halves and the yolk mixture separately up to 2-3 days in advance. Store the egg whites in an airtight container and the yolk mixture in a sealed container or piping bag in the refrigerator. Assemble them no more than 24 hours before serving to ensure the best texture and appearance.
What’s the best way to store leftover deviled eggs?
If you happen to have any leftovers, I store them in an airtight container in the refrigerator. A deviled egg tray with a lid is ideal as it keeps them from sliding around. They are best enjoyed within 2 days for optimal taste and safety.
What if I don’t have a piping bag to create the design?
No problem at all! I often use a small spoon to fill the egg whites. You can carefully spoon the yolk mixture into the centers, mounding it slightly, then use the back of the spoon to gently shape it into a dome. You can still use a toothpick to create the pumpkin ridges, even with a spooned filling. Another trick is to snip the corner off a sturdy Ziploc bag and use that as an impromptu piping bag!
Can I freeze deviled eggs?
Unfortunately, I don’t recommend freezing deviled eggs. The texture of the egg whites becomes rubbery and watery after freezing and thawing, which really detracts from the enjoyable experience of a fresh deviled egg. It’s best to enjoy them fresh or within a couple of days from the refrigerator.
Are these Pumpkin Patch Deviled Eggs kid-friendly to make?
Oh, absolutely! I think these are one of the most fun recipes to make with kids. Peeling the eggs (with supervision!), mashing the yolks, and especially creating those cute pumpkin ridges with a toothpick are all tasks little hands can help with. It’s a wonderful way to get them involved in festive cooking!
Conclusion
I truly hope these Pumpkin Patch Deviled Eggs bring a huge smile to your face and add a touch of playful festivity to your fall gatherings. They’re such a simple way to celebrate the season, and I promise you, they taste even better than they look! It’s all about making cooking joyful and approachable, and these little pumpkins certainly do that for me.
I would absolutely love to hear from you! If you try this recipe, please leave a comment below and let me know how they turned out. Do you have any creative stem ideas I didn’t think of? Or perhaps a special trick for the smoothest yolk filling? Share your photos with me too; I can’t wait to see your adorable Pumpkin Patch Deviled Eggs! Happy cooking, my friends!