
Stunning Pumpkin Cheese Ball for Any Feast

Hello there, fellow food lover! I’m Maya Anderson, and I’m so excited to share one of my absolute favorite festive appetizers with you today. If you’re anything like me, you love creating dishes that impress without adding any extra stress, especially during the busy fall season. This spectacular Pumpkin Cheese Ball is exactly that.
It’s a true showstopper for any gathering, from a casual autumn get-together to a grand holiday feast, and it looks far more complicated than it actually is. Seriously, the hands-on prep time is a breeze, usually around 15-20 minutes, then it just needs a little chill time in the fridge to work its magic. Trust me, your guests will be raving about this delightful and savory centerpiece!
Table of Contents
Why You’ll Love This Festive Pumpkin Cheese Ball
I truly believe that cooking should be joyful and easy, and this Pumpkin Cheese Ball perfectly embodies that philosophy. Here’s why I know you’ll adore making it:
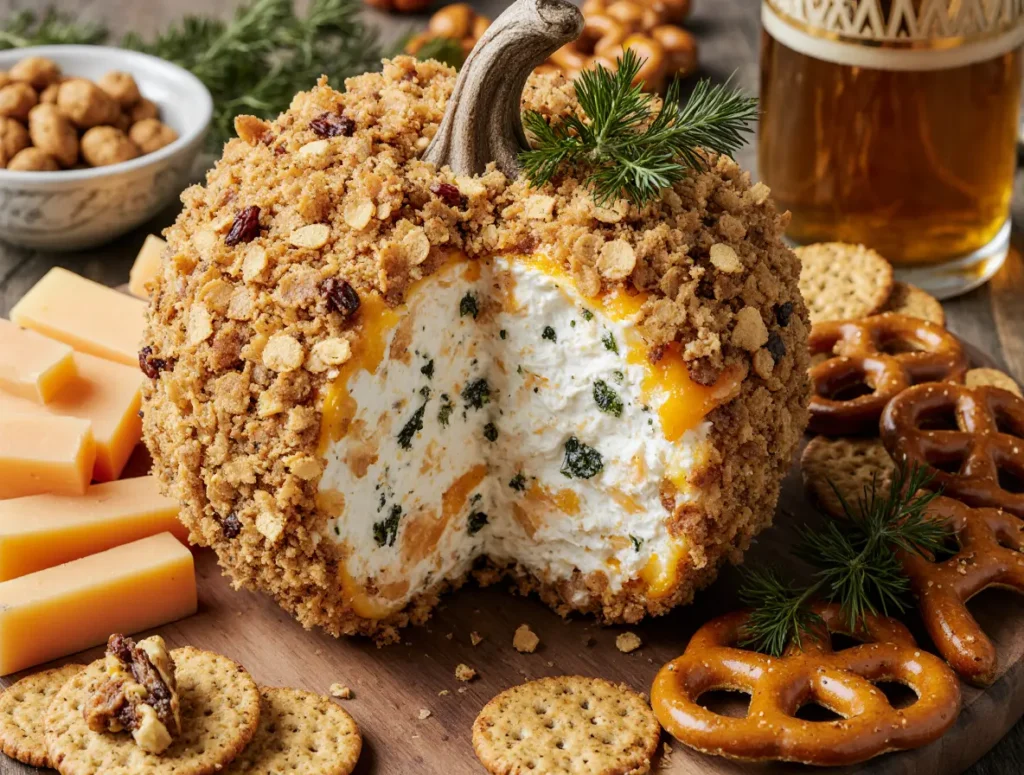
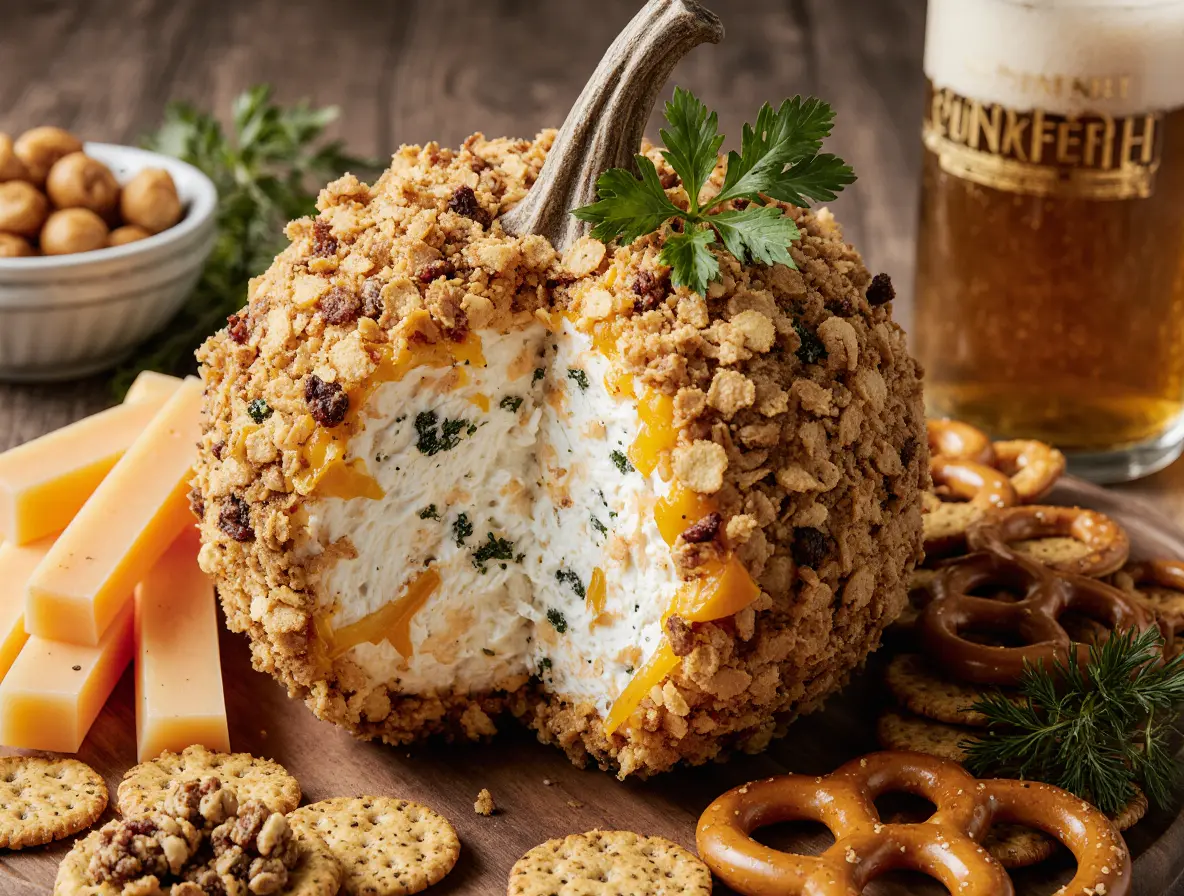
- Visually Stunning: It’s impossible for this cheese ball not to grab attention! The vibrant colors and distinct pumpkin shape make it a delightful centerpiece on any appetizer spread, instantly adding a festive touch to your table.
- Surprisingly Simple to Make: Despite its impressive appearance, crafting this cheese ball is incredibly straightforward. With just a few basic ingredients and my easy-to-follow steps, you’ll have a gorgeous appetizer ready in no time.
- The Ultimate Crowd-Pleaser: Who doesn’t love a good cheese ball? The creamy, savory flavors are universally appealing, ensuring everyone, from the pickiest eaters to the most seasoned foodies, will enjoy a bite (or two!).
- Perfect for Making Ahead: One of my favorite things about this recipe is its make-ahead potential. You can prepare it a day or two in advance, freeing up your precious time on the day of your event and making hosting much more relaxed.
What Exactly is a Pumpkin Cheese Ball?
When you hear “Pumpkin Cheese Ball,” you might first think of pumpkin flavor, but I’m here to clarify! Traditionally, a Pumpkin Cheese Ball refers to its charming shape, not necessarily its taste. It’s a delightful, savory blend of cream cheeses, often mixed with herbs, spices, and other delicious additions, all molded into a round shape with clever indentations to resemble a pumpkin.
It’s an appetizer designed to be spread on crackers, vegetables, or breads. While I’ll definitely share how to add actual pumpkin flavor later on, the classic version focuses on that iconic, festive autumn look with a rich, creamy, and savory profile. It’s perfect for dipping and snacking!
Ingredients for Your Perfect Pumpkin Cheese Ball
Creating this festive appetizer starts with a few simple, yet incredibly flavorful, ingredients. Here’s what you’ll need to gather:
- 8 ounce block cream cheese (softened to room temperature)
- 8 ounce tub vegetable cream cheese
- 2 Tablespoons Hidden Valley Spicy Ranch mix (or regular ranch)
- 3 green onions, sliced (green parts only – can use whites if you like)
- 1 red pepper, finely diced (save the stem)
- 2 cups shredded sharp cheddar cheese (divided use)
I always recommend letting your block cream cheese soften completely to room temperature. This tiny step makes a huge difference in achieving a perfectly smooth and lump-free cheese ball mixture. Also, I truly believe sharp cheddar cheese gives this recipe the best depth of flavor. Its robust, tangy notes really shine through the creamy base, creating a more dynamic and enjoyable bite.
Step-by-Step: Crafting Your Festive Pumpkin Cheese Ball
Now for the fun part: bringing this beautiful appetizer to life! Don’t worry, I’ll walk you through each step, and you’ll see just how easy it is to achieve that stunning pumpkin shape.
- Using an electric or stand mixer, combine 8 ounce block cream cheese and 8 ounce tub vegetable cream cheese.
- Then stir in 2 Tablespoons Hidden Valley Spicy Ranch mix, 3 green onions, sliced, 1 red pepper, finely diced, and one cup shredded cheddar cheese.
- Spread out a large sheet of plastic wrap.
- Sprinkle about 1/4 cup of the shredded cheddar cheese onto the plastic wrap.
- Then top with cheese ball mixture.
- Take the rest of the shredded cheddar cheese and sprinkle it onto the tops and sides of the cheese ball and wrap it up well with cling wrap.
- Two layers of cling wrap work best. It needs to be well-wrapped and wrapped tightly. Now, time to wrap it up with four large and wide rubber bands (you can also use kitchen twine for this).
- I don’t want any cheese ball mix squeezing out while I’m putting on the rubber bands. I had to double wrap each rubber band to get those long indentations I’m looking for to make the pumpkin shape.
- Place cheese ball into the fridge for a minimum of two hours (overnight is best.) Not only do the flavors get better as it sits, but as the mixture cools, it will help it to form that pumpkin shape.
- When ready, cut off the rubber bands and carefully remove the cling wrap.
- Then add on the red pepper stem to the top. Just gently push it in there.
- Serve with your favorite buttery crackers.
When it comes to shaping, those rubber bands are your best friend for achieving those crisp, well-defined pumpkin lines! I find that doubling up each rubber band helps create deeper grooves, which makes your cheese ball look even more like a real pumpkin. Make sure the cling wrap is super tight before you add the bands; this prevents any bits of cheese mixture from squeezing out. For the final coating, I press the remaining shredded cheddar onto the top and sides gently but firmly. This ensures the cheese adheres beautifully and stays in place, giving you a gorgeous, evenly coated Pumpkin Cheese Ball that holds its shape like a dream.
Stunning Pumpkin Cheese Ball for Any Feast
Ingredients
Equipment
Method
- Using an electric or stand mixer, combine 8 ounce block cream cheese and 8 ounce tub vegetable cream cheese.
- Then stir in 2 Tablespoons Hidden Valley Spicy Ranch mix, 3 green onions, sliced, 1 red pepper, finely diced, and one cup shredded cheddar cheese.
- Spread out a large sheet of plastic wrap.
- Sprinkle about 1/4 cup of the shredded cheddar cheese onto the plastic wrap.
- Then top with cheese ball mixture.
- Take the rest of the shredded cheddar cheese and sprinkle it onto the tops and sides of the cheese ball and wrap it up well with cling wrap.
- Two layers of cling wrap work best. It needs to be well-wrapped and wrapped tightly. Now, time to wrap it up with four large and wide rubber bands (you can also use kitchen twine for this).
- I don’t want any cheese ball mix squeezing out while I’m putting on the rubber bands. I had to double wrap each rubber band to get those long indentations I’m looking for to make the pumpkin shape.
- Place cheese ball into the fridge for a minimum of two hours (overnight is best.) Not only do the flavors get better as it sits, but as the mixture cools, it will help it to form that pumpkin shape.
- When ready, cut off the rubber bands and carefully remove the cling wrap.
- Then add on the red pepper stem to the top. Just gently push it in there.
- Serve with your favorite buttery crackers.
Notes
Maya’s Pro Tips for a Show-Stopping Pumpkin Cheese Ball
I love sharing little tricks that make a big difference, and this Pumpkin Cheese Ball is no exception! Here are a few of my go-to tips to ensure your appetizer is absolutely perfect:
- If your cheese ball feels a bit too soft after mixing, don’t fret! Just pop the mixture into the fridge for about 30 minutes before shaping. If it’s too hard, let it sit out at room temperature for a few minutes to soften slightly.
- To ensure the shredded cheddar coating sticks beautifully and evenly, I gently but firmly press it all over the surface of the cheese ball. You can even roll the cheese ball on a plate of shredded cheese for a uniform finish.
- While the red pepper stem is wonderfully clever, don’t hesitate to get creative! I’ve used a pretzel stick, a small rosemary sprig, or even a real, tiny pumpkin stem for an extra authentic touch. Toasted pumpkin seeds sprinkled around the base also add a lovely crunch and visual appeal.
Elevating Your Pumpkin Cheese Ball: Savory & Sweet Variations
I always encourage you to make recipes your own, and this Pumpkin Cheese Ball is wonderfully versatile! Here are some ideas to spark your creativity, whether you’re craving something savory, a touch of sweetness, or need to adapt for dietary needs.
| Category | Variation Idea | Notes |
|---|---|---|
| Savory Twist | Smoky Chipotle & Corn: Add 1/4 cup roasted corn (canned or frozen, thawed), 1-2 teaspoons chipotle powder, and a pinch of smoked paprika to the cheese mixture. | This gives it a delicious Tex-Mex flair, perfect for serving with tortilla chips. |
| Sweet Twist | Cranberry Pecan Delight: Stir in 1/4 cup dried cranberries and 1/4 cup finely chopped pecans into the cheese mixture. | A lovely option for holiday tables; serve with apple slices or ginger snaps for a unique flavor combination. |
| Truly Pumpkin-Flavored (Sweet) | Spiced Pumpkin Delight: Reduce vegetable cream cheese to 6 oz. Add 2 Tablespoons pumpkin puree (not pie filling), 1/2 teaspoon pumpkin pie spice, and a pinch of brown sugar. | This gives a subtle, sweet pumpkin flavor, perfect for fall! Roll in crushed gingersnaps or toasted pecans for coating. |
| Truly Pumpkin-Flavored (Savory) | Herbed Pumpkin Savory: Reduce vegetable cream cheese to 6 oz. Add 2 Tablespoons pumpkin puree, 1/2 teaspoon dried sage, and a pinch of nutmeg. | A more savory take on pumpkin flavor. Serve with rustic bread or celery sticks. |
| Dietary Modifications | Gluten-Free: Serve with your favorite gluten-free crackers, rice crackers, or crisp vegetable sticks. | There are so many delicious gluten-free cracker options available now! |
| Low-Carb: Pair with cucumber slices, bell pepper strips, celery sticks, or pork rinds. | Great for those mindful of carb intake; the cheese ball itself is naturally low-carb. | |
| Dairy-Free Base: While this recipe relies on dairy, I’ve seen success with cashew-based cream cheese alternatives. | Ensure you use a brand that has a firm texture when chilled to help the cheese ball hold its shape. Flavoring might need adjustment based on the alternative’s taste. |
Perfect Pairings: What to Serve with Your Pumpkin Cheese Ball
A fantastic Pumpkin Cheese Ball deserves equally fantastic companions! I love making a beautiful spread, and these pairings will elevate your appetizer to a whole new level.
For crackers, think beyond the basic! I adore buttery crackers like Ritz, or flaky water crackers, and even hearty whole-wheat crackers for a contrasting texture. Pretzel thins also add a wonderful saltiness and crunch. Don’t forget fresh vegetables either; crisp cucumber slices, vibrant bell pepper strips, and crunchy celery sticks are always a hit.
You can also create a truly impressive platter by adding some fruit like apple slices or grapes, a few cured meats like prosciutto or salami, and some spiced nuts or fig jam for an extra layer of flavor. For a kid-friendly Halloween theme, mini carrot sticks and pretzel rods are perfect dippers!
To really complete the festive vibe, consider drink pairings. A crisp hard cider or a dry white wine like Sauvignon Blanc or Pinot Grigio beautifully complements the savory flavors. For non-alcoholic options, a sparkling apple cider or a cranberry-infused seltzer would be absolutely delightful.

Make-Ahead & Storage Tips for Your Pumpkin Cheese Ball
One of the best features of this Pumpkin Cheese Ball is how well it lends itself to make-ahead preparation, taking the pressure off your event day! I often make mine a day in advance, and here’s how I do it:
You can fully prepare the cheese ball, including shaping it and wrapping it in cling wrap with the rubber bands, up to 2-3 days before you plan to serve it. Just keep it tightly wrapped and refrigerated. The flavors actually meld and deepen over this time, making it even more delicious!
When it’s time to serve, simply remove it from the fridge about 15-20 minutes beforehand to allow it to soften slightly, making it easier to spread. Then, cut off the rubber bands, remove the cling wrap, and add your red pepper stem. Any leftovers should be re-wrapped tightly in plastic wrap and stored in the refrigerator for up to 5 days. I find that it maintains its deliciousness beautifully, ready for a quick snack!
Frequently Asked Questions about Pumpkin Cheese Balls
I often get asked some great questions about this recipe, so I’ve put together a little FAQ section to help you out!
Can I use different types of cheese in my cheese ball? A: Absolutely! I love sharp cheddar for its robust flavor, but you can definitely experiment. Smoked gouda, Monterey Jack, or even a bit of Parmesan can add interesting notes. Just be sure to use shredded cheese that will blend well.
What if I don’t have an electric mixer? A: No problem at all! You can definitely make this by hand. Just make sure your cream cheese is extra soft, and use a sturdy spoon or spatula to thoroughly combine all the ingredients until smooth. It might take a bit more elbow grease, but it’s totally achievable.
My cheese ball isn’t holding its pumpkin shape. What went wrong? A: This usually happens if the cheese ball mixture is too warm or not chilled long enough. Make sure your cling wrap is very tight, and the rubber bands are snug. Most importantly, ensure it chills for at least two hours, but overnight is always best for a firm, perfectly shaped result.
Can I make mini pumpkin cheese balls? A: Yes, and they are adorable! Simply divide the mixture into smaller portions after combining, shape each into a small ball, and then use smaller rubber bands (like those for braids) or kitchen twine to create the pumpkin segments. Adjust chilling time slightly if they are very small.
What are some alternative coatings besides shredded cheddar? A: You have so many options! I’ve seen people use finely chopped pecans or walnuts, toasted sesame seeds, chopped fresh parsley, or even a mix of dried cranberries and pecans for a festive look and taste. Just roll the chilled cheese ball in your chosen coating before adding the stem.
Conclusion
I hope you’re feeling as excited as I am about making this absolutely delightful and impressive Pumpkin Cheese Ball! It truly embodies everything I love about cooking: it’s approachable, incredibly tasty, and looks like a masterpiece without requiring hours in the kitchen. This recipe is more than just an appetizer; it’s an invitation to bring a little extra joy and festivity to your table.
So, when you find yourself wondering “What will I cook?” for your next fall gathering, I encourage you to give this beautiful Pumpkin Cheese Ball a try. I promise it will be a recipe you return to again and again. Once you’ve made it, please come back and leave a comment below with your own tips, questions, or how your guests reacted! I can’t wait to see your festive creations on social media too; don’t forget to tag me @whatwillcook. Happy cooking, my friend!