
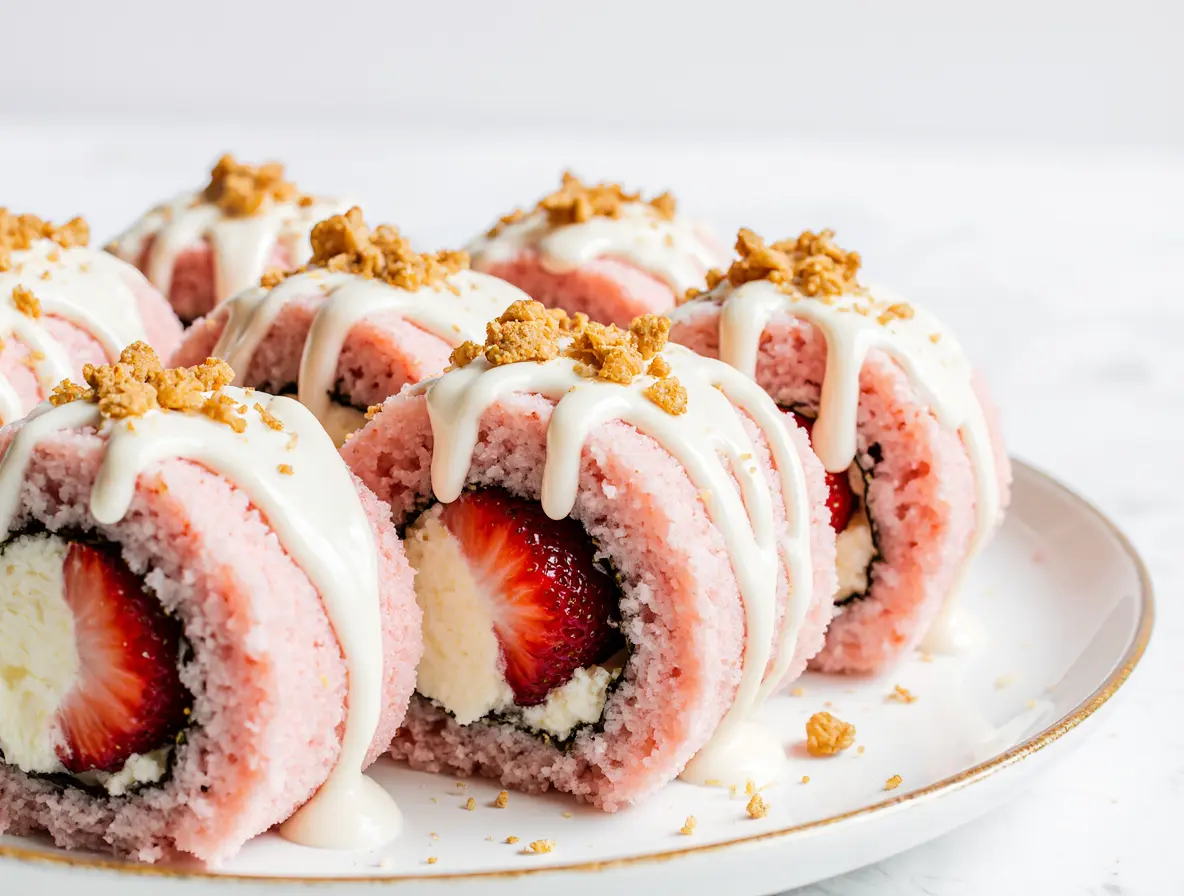
Irresistibly Delicious Strawberry Shortcake Cheesecake Sushi

You might be thinking, “Dessert sushi?” And I totally get it, but trust me on this! My Strawberry Shortcake Cheesecake Sushi is a truly delightful culinary mash-up. It takes all the best parts of a classic American strawberry shortcake and combines them with the creamy indulgence of cheesecake, all wrapped up in a fun, elegant “sushi” presentation.
Imagine a soft, airy sponge cake rolled around a luscious, tangy cheesecake filling, studded with sweet macerated strawberries. Then, I drizzle it with vibrant strawberry purée and a touch of white chocolate. Each slice looks just like a beautiful sushi roll, but it’s 100% sweet and decadent. It’s a playful way to enjoy beloved dessert flavors in a completely new and exciting way.
Table of Contents
Why You’ll Love This Strawberry Shortcake Cheesecake Sushi Recipe
I truly believe this recipe will become a new favorite in your kitchen, and here’s why I think you’ll adore it. First, it strikes the perfect balance between the bright, sweet notes of fresh strawberries and the rich, tangy creaminess of cheesecake. It’s absolutely heavenly!
Then there’s the “sushi” presentation, which is not only adorable but also surprisingly elegant and impressive for guests. You can also make this dessert ahead of time, which is a huge bonus for busy days or entertaining. Despite its sophisticated look, I promise you it’s surprisingly approachable to create, making it a truly joyful baking project.
Ingredients for the Perfect Strawberry Shortcake Cheesecake Sushi
I always say that great ingredients make great food, and this dessert is no exception. Here are the exact ingredients you’ll need for this delicious Strawberry Shortcake Cheesecake Sushi, along with my little tips for choosing the best quality.
For the Moist Sponge Cake
To achieve that perfectly light and airy sponge, I use:
- 4 large eggs, room temperature
- ¾ cup granulated sugar
- 1 tsp vanilla extract
- ¾ cup all-purpose flour
- 1 tsp baking powder
- ¼ tsp salt
- ½ cup powdered sugar (for dusting)
My Tip: For maximum volume and a truly fluffy cake, it’s super important to make sure your eggs are at room temperature. This helps them whip up beautifully!
For the Tangy Cheesecake Filling
The creamy heart of our dessert sushi comes from these ingredients:
- 8 oz (225g) cream cheese, softened
- ½ cup powdered sugar
- 1 tsp vanilla extract
- 1 cup heavy whipping cream, chilled
My Tip: For the best texture and flavor, I always recommend using full-fat, block cream cheese. Also, ensure it’s properly softened at room temperature to avoid lumps in your filling.
For the Sweet Strawberry Layers
The star of our “shortcake” element is, of course, the strawberries:
- 1 cup fresh strawberries, diced
- 2 tbsp granulated sugar
- ½ cup fresh strawberries, puréed
- 1 tbsp powdered sugar
My Tip: Try to pick ripe, fragrant strawberries that are in season. They’ll give you the most vibrant flavor and natural sweetness, which makes a huge difference.
For the Drizzles & Garnishes
These finishing touches add both beauty and extra deliciousness:
- ½ cup white chocolate chips, melted
- 2 tbsp heavy cream
- Extra fresh strawberries, halved
- Crushed shortbread cookies or graham crackers
My Tip: While I’m using white chocolate here, feel free to experiment with other drizzles, like a dark chocolate ganache, if you’re feeling adventurous with your next batch!
Step-by-Step: Crafting Your Strawberry Shortcake Cheesecake Sushi
Now for the fun part: putting it all together! I’ve broken down the process into easy-to-follow steps, just like I would walk a friend through it in my own kitchen. You’ve got this!
Preparing the Fluffy Sponge Cake
First, I preheat my oven to 350°F (175°C). Then, I line a 10×15-inch jelly roll pan with parchment paper, making sure to leave an overhang on the sides for easy removal, and lightly grease the paper. In a large bowl, I beat the room temperature eggs on high speed for a full 5 minutes until they become wonderfully thick and pale. I gradually add the granulated sugar and vanilla extract, beating until everything is well combined and glossy.
In a separate bowl, I whisk together the all-purpose flour, baking powder, and salt. Now, this next part is key: I gradually fold the dry ingredients into the egg mixture until they are just combined, making sure to be gentle to keep that airy texture we’ve worked so hard for. I pour the batter into my prepared pan, spreading it evenly with a spatula, and then gently tap the pan lightly on the counter to remove any air bubbles. I bake it for 10-12 minutes, or until the cake springs back when I lightly touch the center.
While the cake is baking, I lay a clean kitchen towel on a flat surface and dust it generously with powdered sugar. The moment the cake is done, I immediately invert it onto the prepared towel. I carefully peel off the parchment paper, and starting at the short end, I gently roll the warm cake up with the towel inside. This is a little trick to teach the cake to roll! I then let it cool completely in this rolled shape. Rolling it warm helps prevent cracks later, and if you do get a tiny crack, don’t worry, the filling will hide it!
Making the Creamy Cheesecake Filling
Now, let’s get that dreamy cheesecake filling ready. In a medium bowl, I beat the softened cream cheese until it’s perfectly smooth and creamy, with no lumps in sight. I gradually add the powdered sugar and vanilla extract, beating until it’s well combined and fluffy.
In a separate bowl, I whip the chilled heavy cream until it forms beautiful, stiff peaks. This is where a cold bowl helps! I then gently fold the whipped cream into the cream cheese mixture until it’s smooth and wonderfully fluffy. Make sure not to over-beat the cream cheese; just mix until smooth. And remember, truly cold heavy cream is your best friend for stiff peaks.
Macerating the Fresh Strawberries
For those bursts of sweet strawberry flavor, I prepare them next. In a small bowl, I toss the diced fresh strawberries with granulated sugar. I let them sit for about 10 minutes to release their natural juices, which sweetens them even further and creates a lovely, light syrup. This process, called maceration, really intensifies their flavor and makes them even juicier!
Assembling Your Dessert Sushi Rolls
This is where our Strawberry Shortcake Cheesecake Sushi really comes to life! Carefully, I unroll the cooled sponge cake. I then spread a thin, even layer of the cheesecake filling over the entire surface, making sure to leave a small border around the edges.
Next, I evenly distribute the macerated strawberries over the cheesecake layer. Now for the re-rolling: I gently roll the cake back up without the towel, using the towel underneath to help lift and guide the cake as I roll it into a tight log. Once rolled, I wrap the cake tightly in plastic wrap and refrigerate it for at least 1 hour to allow it to set firmly. A tight roll makes for prettier “sushi” slices later, so try to keep it snug!
The Finishing Touches: Drizzles & Garnishes
Now for the beautiful final touches! I purée the remaining fresh strawberries and mix them with powdered sugar until smooth; this creates our vibrant strawberry drizzle. I generously drizzle this lovely mixture over the chilled cake roll.
Next, I melt the white chocolate chips in a microwave-safe bowl in 15-second intervals, stirring in between, until it’s perfectly smooth. I stir in the heavy cream to create a smooth, pourable consistency for our white chocolate drizzle. I then drizzle the white chocolate over the strawberry drizzle on the cake roll, creating a pretty pattern.
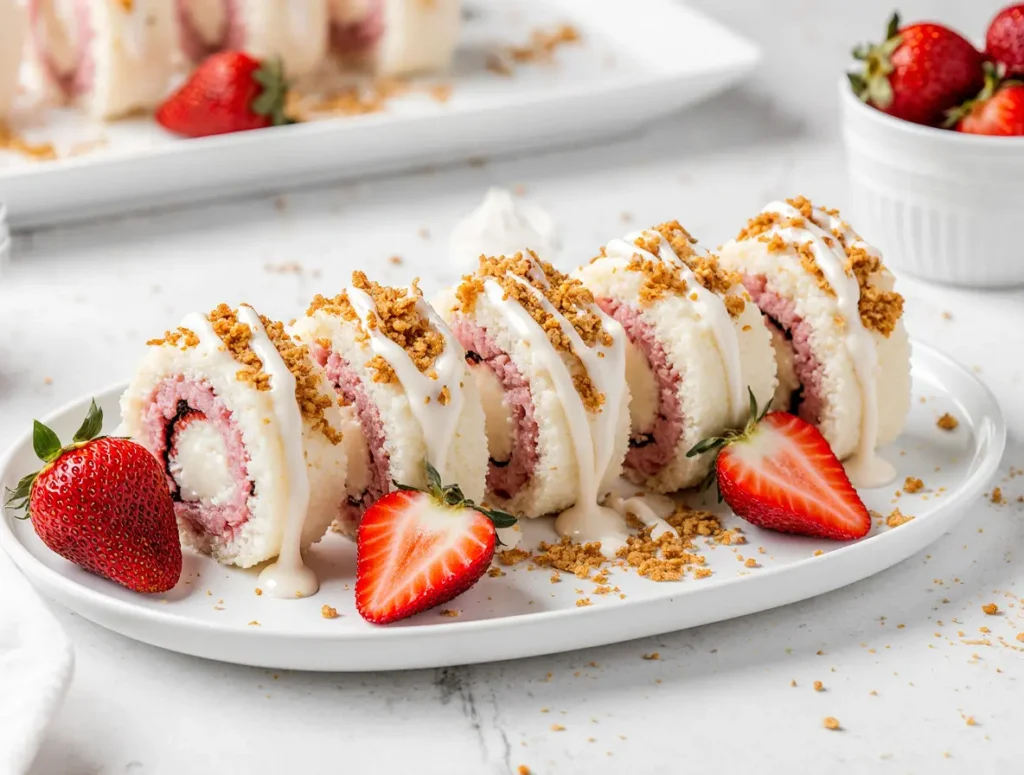
Finally, I cut the cake into sushi roll-sized pieces. For the prettiest presentation, I garnish each piece with a halved fresh strawberry on top and a sprinkle of crushed shortbread cookies or graham crackers for that extra delightful crunch. I refrigerate the assembled sushi rolls for another 30 minutes to let all those amazing flavors meld together beautifully before serving. A warm, sharp knife helps with clean slices; simply run it under hot water and wipe it clean between each cut. Feel free to get creative with your garnishes; a tiny mint leaf can also add a pop of color!
Irresistibly Delicious Strawberry Shortcake Cheesecake Sushi
Ingredients
Equipment
Method
- First, I preheat my oven to 350°F (175°C). Then, I line a 10×15-inch jelly roll pan with parchment paper, making sure to leave an overhang on the sides for easy removal, and lightly grease the paper.
- In a large bowl, I beat the room temperature eggs on high speed for a full 5 minutes until they become wonderfully thick and pale. I gradually add the granulated sugar and vanilla extract, beating until everything is well combined and glossy.
- In a separate bowl, I whisk together the all-purpose flour, baking powder, and salt. Now, this next part is key: I gradually fold the dry ingredients into the egg mixture until they are just combined, making sure to be gentle to keep that airy texture we’ve worked so hard for.
- I pour the batter into my prepared pan, spreading it evenly with a spatula, and then gently tap the pan lightly on the counter to remove any air bubbles. I bake it for 10-12 minutes, or until the cake springs back when I lightly touch the center.
- While the cake is baking, I lay a clean kitchen towel on a flat surface and dust it generously with powdered sugar. The moment the cake is done, I immediately invert it onto the prepared towel. I carefully peel off the parchment paper, and starting at the short end, I gently roll the warm cake up with the towel inside. I then let it cool completely in this rolled shape.
- In a medium bowl, I beat the softened cream cheese until it’s perfectly smooth and creamy, with no lumps in sight. I gradually add the powdered sugar and vanilla extract, beating until it’s well combined and fluffy.
- In a separate bowl, I whip the chilled heavy cream until it forms beautiful, stiff peaks. I then gently fold the whipped cream into the cream cheese mixture until it’s smooth and wonderfully fluffy.
- In a small bowl, I toss the diced fresh strawberries with granulated sugar. I let them sit for about 10 minutes to release their natural juices.
- Carefully, I unroll the cooled sponge cake. I then spread a thin, even layer of the cheesecake filling over the entire surface, making sure to leave a small border around the edges.
- Next, I evenly distribute the macerated strawberries over the cheesecake layer. Now for the re-rolling: I gently roll the cake back up without the towel, using the towel underneath to help lift and guide the cake as I roll it into a tight log.
- Once rolled, I wrap the cake tightly in plastic wrap and refrigerate it for at least 1 hour to allow it to set firmly.
- Now for the beautiful final touches! I purée the remaining fresh strawberries and mix them with powdered sugar until smooth; this creates our vibrant strawberry drizzle. I generously drizzle this lovely mixture over the chilled cake roll.
- Next, I melt the white chocolate chips in a microwave-safe bowl in 15-second intervals, stirring in between, until it’s perfectly smooth. I stir in the heavy cream to create a smooth, pourable consistency for our white chocolate drizzle. I then drizzle the white chocolate over the strawberry drizzle on the cake roll, creating a pretty pattern.
- Finally, I cut the cake into sushi roll-sized pieces. For the prettiest presentation, I garnish each piece with a halved fresh strawberry on top and a sprinkle of crushed shortbread cookies or graham crackers for that extra delightful crunch.
- I refrigerate the assembled sushi rolls for another 30 minutes to let all those amazing flavors meld together beautifully before serving.
Notes
Choosing Your Cake Base: Tips for the Best Strawberry Shortcake Cheesecake Sushi
The cake base is truly the foundation of our Strawberry Shortcake Cheesecake Sushi, so I always pay close attention to it. While my recipe calls for a homemade sponge cake, which gives you the freshest and most control over texture, you certainly have options. A homemade sponge is wonderfully light and airy, perfect for rolling without cracking.
If you’re short on time, I understand! You could opt for a good quality store-bought sponge cake or an angel food cake sheet, as long as it’s thin and flexible enough to roll. When choosing store-bought, look for one that feels moist and isn’t too dense. While other thin cake bases might work, I really recommend sticking with a sponge cake; its delicate texture is ideal for creating those beautiful, tight rolls and truly embodies the “shortcake” spirit of this dessert.
Creative Variations & Customizations for Your Strawberry Shortcake Cheesecake Sushi
I love how versatile this recipe is! Here are some fun ideas to make it your own, whether you’re catering to dietary needs or just want to try something new.
| Variation Category | Ideas & Instructions |
|---|---|
| Swaps for Dietary Needs & Preferences | To make this dessert vegan, you can swap traditional cream cheese for a dairy-free cream cheese alternative and use coconut cream (the thick part from a chilled can) whipped into stiff peaks for the heavy cream. For a gluten-free version, simply use a gluten-free sponge cake mix according to package directions. |
| Drizzle & Topping Adventures | Instead of white chocolate, you could try a rich dark chocolate ganache, a sweet caramel drizzle, or even a tangy raspberry purée. For other toppings, toasted coconut flakes, colorful sprinkles, or mini chocolate chips would all add fun texture and visual appeal. |
| Seasonal Fruit Substitutions | When strawberries aren’t in season, I love to experiment! You can use other fresh berries like raspberries or blueberries, or even thinly sliced kiwi for a tropical twist. Just prepare them similarly; macerate with sugar if needed, or purée for a drizzle. |
| Mini Rolls for Parties | For delightful bite-sized treats perfect for parties, you can make smaller rolls! Simply use a smaller cake pan for a thinner cake, or slice the larger cake into shorter lengths before rolling. This creates adorable, single-serving “sushi” pieces. |
Make-Ahead & Storage Tips for Strawberry Shortcake Cheesecake Sushi
Life gets busy, so I’m all about recipes that offer flexibility! Here’s how you can prepare parts of your Strawberry Shortcake Cheesecake Sushi ahead of time and keep the finished dessert fresh.
Preparing Components Ahead of Time
You can absolutely get a head start on this recipe! I often bake the sponge cake a day in advance; once it’s cooled and rolled in the towel, I wrap it tightly in plastic wrap and store it at room temperature. The cheesecake filling can be made up to 2 days ahead and stored in an airtight container in the refrigerator. You can also dice and macerate the strawberries a day before; just keep them covered in the fridge. These steps help break up the prep time, making assembly a breeze!
Storing Your Finished Dessert Sushi
Once your Strawberry Shortcake Cheesecake Sushi rolls are assembled and garnished, I recommend storing them in an airtight container in the refrigerator. They will stay fresh and delicious for up to 3 days. Freezing isn’t ideal for the best texture due to the delicate sponge cake and fresh strawberries, so I usually recommend enjoying them fresh within a few days.
Serving & Presentation Ideas for Your Dessert Sushi
This dessert is so visually appealing, and I love creating a presentation that highlights its unique “sushi” concept. It makes serving even more special!
Elegant Plating Techniques
When I serve my Strawberry Shortcake Cheesecake Sushi, I like to arrange the individual rolls on a beautiful platter, much like you would traditional sushi. I often fan them out slightly or stack them artfully. For extra flair, I might add a few fresh halved strawberries, a sprinkle of shortbread crumbs, or even a tiny edible flower alongside each piece. A drizzle of extra strawberry purée on the plate itself can also create a stunning visual.
Perfect Pairings: Drinks & Occasions
This elegant yet playful dessert pairs wonderfully with a variety of drinks. For non-alcoholic options, I love serving it with a crisp sparkling cider or a fragrant green tea. If you’re looking for an alcoholic pairing, a light rosé, a Moscato, or a delicate sparkling wine would be absolutely lovely. This Strawberry Shortcake Cheesecake Sushi is perfect for brunches, bridal showers, spring and summer parties, or any occasion where you want to impress your guests with something truly unique and delicious!
Frequently Asked Questions About Strawberry Shortcake Cheesecake Sushi
I often get asked questions about my recipes, so I wanted to address some common ones you might have about this delightful Strawberry Shortcake Cheesecake Sushi.
Can I use frozen strawberries instead of fresh?
While I always recommend fresh, peak-season strawberries for the best flavor and texture, you can use frozen strawberries in a pinch. If you do, I suggest thawing them completely and draining any excess liquid before dicing them for the filling or puréeing them for the drizzle. You might find their texture a bit softer, but they’ll still deliver that lovely strawberry taste.
What if my cake cracks when rolling?
Don’t panic if your cake cracks a little bit when you’re rolling it! It happens to the best of us. The good news is that the creamy cheesecake filling is very forgiving. Simply continue to roll the cake as best as you can; the filling will usually fill in and hide any minor cracks. Once chilled and sliced, no one will even notice!
How long do these Strawberry Shortcake Cheesecake Sushi rolls last?
Once assembled, your Strawberry Shortcake Cheesecake Sushi rolls are best enjoyed within 3 days. I always store them in an airtight container in the refrigerator to maintain their freshness and flavor.
Can I make this Strawberry Shortcake Cheesecake Sushi recipe low-sugar?
Yes, you can certainly adjust the sugar content to your preference! You could use a sugar substitute for both the granulated sugar in the cake and the powdered sugar in the filling and drizzles. For the strawberries, you might find that naturally sweet, ripe berries need less added sugar, or you can use a touch of stevia or erythritol if you prefer. Just taste as you go to get it right for you.