
Ultimate Cheezborger Pretzel Bites Recipe

Oh, I am so excited to share one of my absolute favorite comfort food mash-ups with you today: Cheezborger Pretzel Bites! There is something truly magical about combining the savory goodness of a classic cheeseburger with the chewy, salty charm of a soft pretzel, and let me tell you, these bites are a total crowd-pleaser. They are absolutely perfect for game day, a fun party appetizer, or even a super quick and satisfying dinner. From start to finish, you can have these delicious little gems ready in under an hour, and I promise you, getting delicious results is much easier than it looks.
Table of Contents
Why You’ll Absolutely Love Making These Cheezborger Pretzels
I just know you are going to fall head over heels for these Cheezborger Pretzels, and I have a few compelling reasons why this recipe is a must-make for your kitchen!
First, they are incredibly versatile. Whether you are hosting a lively game day get-together, need a fun appetizer for a party, or just want a quick and satisfying dinner for the family, these bites fit the bill perfectly. They disappear fast, so be warned!
Second, the flavor profile is simply irresistible. I have blended the savory, meaty goodness of a cheeseburger with the distinct, chewy, and salty texture of a soft pretzel. It is a match made in comfort food heaven, offering that perfect balance of familiar flavors in a fun, bite-sized package.
Finally, you will adore the joy of making a homemade snack that feels impressive but is genuinely easier than it looks. Using store-bought pizza dough is my little secret weapon here, saving you loads of time without compromising on that amazing homemade taste. It is such a rewarding experience to pull these golden, salty bites out of the oven.
Ingredients: Everything You Need for Your Cheezborger Pretzel Bites
Every ingredient in this recipe plays a crucial role in creating those perfectly savory and chewy Cheezborger Pretzel Bites. I want to make sure you understand why each one is so important for that amazing flavor and texture!
- 1 lb pizza dough, left out at room temperature for 15-20 minutes: This is my shortcut to perfection! Using store-bought pizza dough makes this recipe incredibly approachable. Letting it come to room temperature makes it much easier to stretch and work with, preventing it from snapping back as you try to roll it.
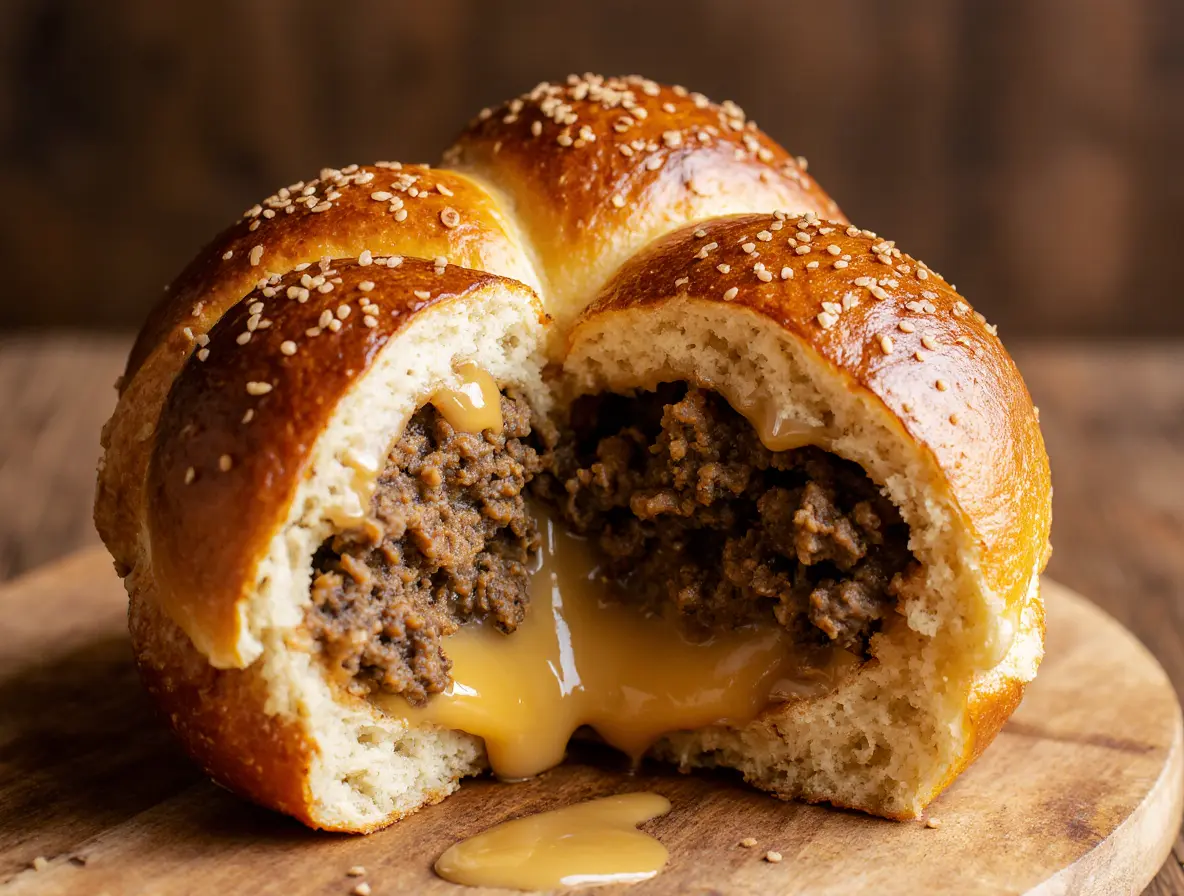
- 7 slices american cheese, cut in half: American cheese is truly non-negotiable here for that classic “cheezborger” experience. It melts beautifully and provides that creamy, slightly tangy flavor we all love in a cheeseburger. Cutting the slices in half makes them the perfect size for tucking inside each bite.
- 14 frozen mini meatballs, thawed: These are the heart of our “borger” filling! Thawing them is crucial; it ensures they cook through evenly with the dough and cheese, preventing any cold spots inside. I find the mini size works best for individual bites.
- ¼ cup baking soda: This is the magic ingredient for any pretzel recipe! The baking soda bath creates an alkaline environment that helps the pretzel dough develop its distinctive chewy crust and beautiful golden-brown color during baking.
- 5 cups water: This is the base for our baking soda bath. Make sure you have enough to fully submerge the pretzel bites in batches.
- 1 egg, beaten: The egg wash is what gives our Cheezborger Pretzel Bites that gorgeous shiny finish and helps the coarse sea salt adhere perfectly. It is a simple step that makes a big visual and textural difference.
- coarse sea salt: Essential for that classic pretzel flavor and crunch! I love how the coarse flakes stand out and add a delightful textural contrast to the chewy dough.
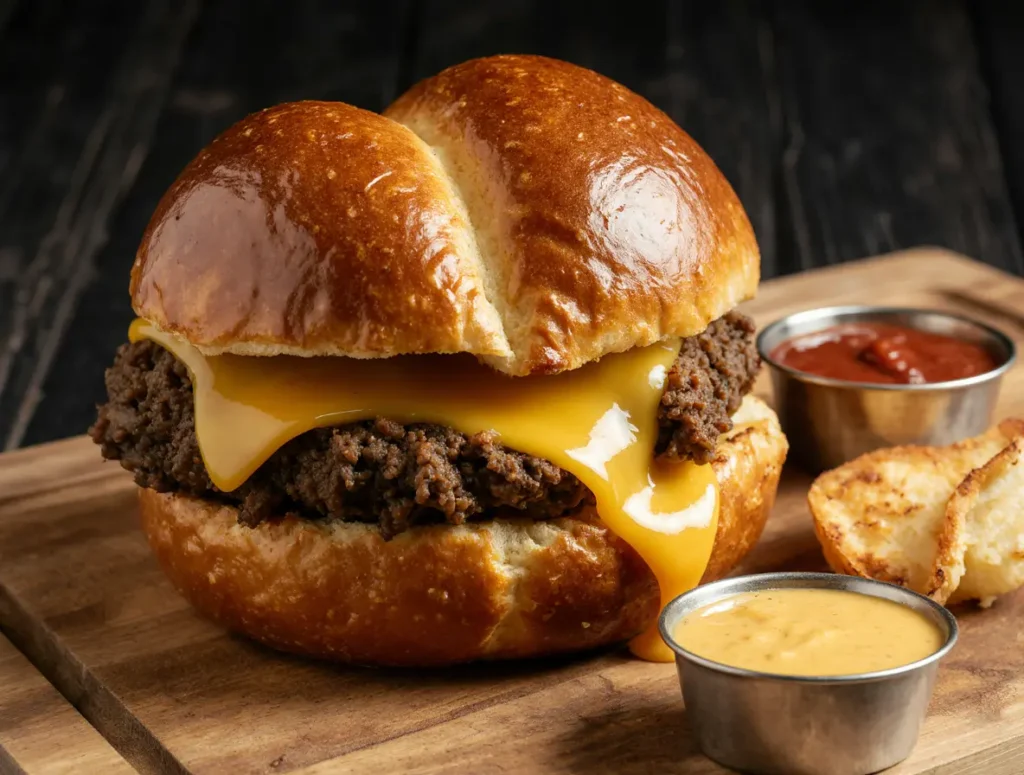
- yellow mustard, for serving (optional): A classic pairing with any cheeseburger or pretzel! While optional, I highly recommend having some on hand for dipping; its tangy bite perfectly complements the rich flavors of the pretzel bites.
Step-by-Step: Crafting Your Delicious Cheezborger Pretzel Bites
Ready to get cooking? I am going to walk you through each step to make these amazing Cheezborger Pretzel Bites. Just follow along, and I promise you will have a delicious treat!
- Preheat the oven to 425˚F (220˚C). Line a baking sheet with parchment paper. I always preheat my oven before I start assembling, so it is ready to go when the bites are. Parchment paper is a lifesaver for easy cleanup and ensures nothing sticks.
- Cut the pizza dough into 14 evenly sized pieces. Working one at a time, stretch out a piece of dough into a long strip, about 8 inches (20 centimeters) long. Taking the time to portion the dough evenly means all your bites will cook similarly. Stretching it into a strip creates the perfect canvas for your filling.
- Place a piece of cheese at the top, followed by a meatball, and roll up the cheese and meatball in the dough. Rotate halfway through rolling to ensure you are completely encasing the cheese and meet in the dough. Pull tightly and use any remaining slack to cover any possible gaps/holes. Press the dough into itself to seal and place on the prepared baking sheet. Repeat with the remaining dough, cheese, and meatballs. This step is crucial! My pro tip is to really focus on getting that filling completely sealed. Any gaps can lead to cheese oozing out, which is delicious but messy. Pressing firmly to seal ensures everything stays tucked inside.
- In a medium saucepan over high heat, bring the 5 cups of water to a boil. Once boiling, add the baking soda and stir to dissolve. Return the pot to a boil. This baking soda bath is what gives your pretzel bites their authentic texture and flavor. Make sure the water is at a rolling boil before adding the baking soda; it helps it dissolve properly.
- In batches (about 3-5 at a time), add the rolled dough balls to the pot and boil for 20-30 seconds, stirring gently. Remove and dab on paper towels before placing back on the baking sheet. Repeat with remaining dough balls. Do not overcrowd the pot; this allows the water to stay hot and the bites to boil evenly. A quick dab on paper towels helps remove excess water, which makes for a crispier crust.
- Brush each boiled ball with beaten egg, then sprinkle with coarse sea salt. This is where the magic happens for that classic pretzel look and taste! The egg wash gives them a beautiful sheen, and the coarse sea salt adds that essential crunch and flavor.
- Bake for 15-20 minutes, until the outsides have browned. Serve warm with mustard, if desired. Keep an eye on them! Ovens vary, so your timing might be slightly different. You are looking for a lovely golden-brown crust.
- Enjoy! There is nothing quite like pulling these warm, savory bites right from the oven.
Ultimate Cheezborger Pretzel Bites Recipe
Ingredients
Equipment
Method
- Preheat the oven to 425˚F (220˚C). Line a baking sheet with parchment paper.
- Cut the pizza dough into 14 evenly sized pieces. Working one at a time, stretch out a piece of dough into a long strip, about 8 inches (20 centimeters) long.
- Place a piece of cheese at the top, followed by a meatball, and roll up the cheese and meatball in the dough. Rotate halfway through rolling to ensure you are completely encasing the cheese and meat in the dough. Pull tightly and use any remaining slack to cover any possible gaps/holes. Press the dough into itself to seal and place on the prepared baking sheet. Repeat with the remaining dough, cheese, and meatballs.
- In a medium saucepan over high heat, bring the 5 cups of water to a boil. Once boiling, add the baking soda and stir to dissolve. Return the pot to a boil.
- In batches (about 3-5 at a time), add the rolled dough balls to the pot and boil for 20-30 seconds, stirring gently. Remove and dab on paper towels before placing back on the baking sheet. Repeat with remaining dough balls.
- Brush each boiled ball with beaten egg, then sprinkle with coarse sea salt.
- Bake for 15-20 minutes, until the outsides have browned. Serve warm with mustard, if desired.
- Enjoy!
Notes
- Internal Filling Twists: Experiment with fillings like crispy bacon bits, caramelized onions, finely diced pickle pieces, or thin jalapeño slices for added flavor.
- Gourmet Cheese Pairings: While American cheese is classic, consider sharp cheddar, smoked gouda, pepper jack, or provolone/mozzarella for gourmet twists.
- Vegetarian & Vegan Options: For vegetarian, use plant-based ground meat substitute or crumbled veggie burgers. For vegan, use plant-based meat alternative, vegan cheese, and a plant-based milk/agave/maple syrup mixture or melted vegan butter for egg wash. Ensure pizza dough is vegan.
- Cheese oozing out: Ensure dough is tightly sealed around the filling. For dry dough, dampen fingertips with water to help sealing.
- Not browning: Check oven temperature; ensure egg wash is applied evenly. Extend baking time slightly if needed.
- Dough too tough/sticky: Lightly dust work surface and hands with flour for sticky dough. If tough, let it sit longer at room temperature.
- Refrigeration: Store cooled bites in an airtight container for up to 3 days.
- Freezing Baked: Freeze cooled, baked bites in a single layer until solid, then transfer to a freezer-safe bag for up to 1 month. Reheat from frozen in oven (350°F/175°C for 10-15 min) or air fryer (350°F/175°C for 5-7 min).
- Freezing Unbaked: After boiling and drying, freeze unbaked bites on parchment paper until solid. Thaw slightly, then apply egg wash and salt, and bake as directed with a few extra minutes.
- Reheating: Oven or air fryer is preferred for crispiness; microwave can make dough soft.
Storing & Reheating Your Cheezborger Pretzels: Keep Them Fresh
I always aim to make enough for leftovers because these Cheezborger Pretzel Bites are just as delicious the next day! Here is how I like to store and reheat them to keep them tasting their best.
For refrigeration, once your pretzel bites have cooled completely, I place them in an airtight container. They will stay fresh in the fridge for up to 3 days.
If you are planning ahead, you can freeze pre-baked bites. Let them cool completely, then arrange them in a single layer on a baking sheet and freeze until solid. Once frozen, transfer them to a freezer-safe bag or container, and they will keep for up to 1 month. When you are ready to enjoy, you can reheat them directly from frozen.
For reheating, my preferred method for baked bites is the oven or air fryer. An oven preheated to 350°F (175°C) for 10-15 minutes will crisp them up beautifully, especially from frozen. In an air fryer, 5-7 minutes at 350°F (175°C) is usually perfect. The microwave works in a pinch for speed, but I find it can make the dough a bit soft, so I usually avoid it if I want that delicious chewy crust.
You can even freeze unbaked bites! After you have boiled them and dabbed them dry, but before the egg wash and salt, place them on a parchment-lined baking sheet and freeze until solid. Transfer to a freezer bag. When ready to bake, you can pull them out, let them thaw slightly on a baking sheet (about 15-20 minutes), then apply the egg wash and salt, and bake as directed, adding a few extra minutes to the baking time.
Serving Suggestions: Presenting Your Cheezborger Pretzel Masterpiece
I just love seeing these Cheezborger Pretzel Bites on a platter; they are truly a showstopper! Beyond just serving them warm with your favorite dipping sauces, here are some of my ideas to make them part of a complete meal or an unforgettable snack spread.
For a fun, casual spread, I often arrange them artfully on a large cutting board or platter, surrounded by a variety of dipping sauces in small bowls. This allows everyone to choose their own adventure!
To make it a more substantial “meal,” I sometimes pair them with mini fries (store-bought frozen ones are totally fine here, I promise!), or even some crispy pickle spears on the side to lean into that classic burger vibe. A fresh, simple side salad with a light vinaigrette offers a lovely contrast and brightness to the rich pretzel bites.
When I am thinking about drink pairings, for adults, a crisp lager or a refreshing pale ale works wonderfully with the savory flavors. For a non-alcoholic option, a classic root beer or even an iced tea fits the bill perfectly for a comforting, nostalgic meal.
Frequently Asked Questions About Cheezborger Pretzels
I get a lot of great questions about my recipes, and I am always happy to share my insights. Here are some common queries I hear about Cheezborger Pretzels:
Can I prepare these ahead of time? Absolutely! I often assemble and boil the pretzel bites ahead of time. Once they are boiled and dabbed dry, I let them cool completely, then place them on a parchment-lined baking sheet and refrigerate them, covered, for up to 24 hours. When you are ready to bake, pull them out, apply the egg wash and salt, and proceed with baking.
What’s the best way to freeze them? I recommend freezing them after they have been baked and cooled. Arrange the cooled pretzel bites on a baking sheet and freeze until solid. Then, transfer them to a freezer-safe bag or container. They will keep for up to a month. Reheat from frozen in the oven or air fryer for best results.
Are there gluten-free alternatives? Yes, there are! I have had success using gluten-free pizza dough for this recipe. Just be aware that gluten-free doughs can sometimes be a bit more delicate or less stretchy, so handle them gently. The boiling and baking process should still work beautifully.
Can I use an air fryer to cook them? Definitely! If you are cooking them from scratch, after the boiling and egg wash steps, you can air fry them at 350°F (175°C) for about 8-12 minutes, or until golden brown and cooked through. Keep an eye on them, as air fryer times can vary. For reheating already baked bites, 5-7 minutes at 350°F (175°C) usually does the trick.
Conclusion
Well, there you have it, my friends, a truly irresistible recipe for Cheezborger Pretzel Bites! I honestly think these savory, chewy, cheesy, and meaty little morsels are the perfect blend of two beloved comfort foods. They are so incredibly versatile, perfect for any gathering, and surprisingly simple to whip up, even for a busy weeknight. I just love how much joy they bring to my kitchen and my table.
I genuinely hope you feel encouraged to try out this recipe. Do not hesitate to make it your own with any of the customization ideas I have shared. I would absolutely love to hear from you! Please leave a comment below with your questions, your own personal recipe twists, or even just to share how much you loved them. And if you snap any photos, tag whatwillcook.com; I cannot wait to see your delicious creations! Happy cooking, my friends!